So to give a small intro to why this is important and why I would like to share the Department of Defense guidelines. I have worked with a DoD department in Cyber Security and have been shared access with a lot of their policies and security measures. Since Windows is a commonly used insecure OS even when not in the cloud having a instance of it in the cloud is risky. However windows security is not a easy quick task and can be extremely time consuming. The DoD department DISA has recently allowed public view to some newer Windows STIGs (Security Technical Implementation Guidelines). I have been shared a auto implementer for mass distribution of windows and I would like to share. This article is not only useful because Windows security is so little talked about but a automation for it is next to nonexistent until now!
This will streamline the process and also will help you in the long run. Its also hosted on my GitHub for quick access!
###NOTE FOR ANYONE WHO USES THIS###
A small amount of Windows Group Policy understanding is needed especially if your using services on the server before installation and after. This may affect RDP logon as it will make you use the username and password by hiding usernames. Make sure a admin logon is available for you to use RDP with.
**Also you may need to change the Password policy after application to prevent lockouts. **
To do this follow these quick instructions after install!!
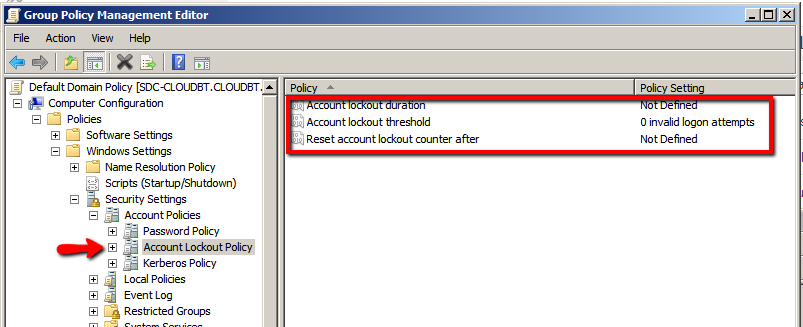
Within the GROUP POLICY EDITOR, in the Computer Configuration\Policies\Windows Settings\Security Settings\Account Policies\Account Lockout Policy node, you can configure the policy settings that determine password requirements.
You should up the account lockout threshold to probably 4-8 for normal use.
**You should DEFINITELY change the option for reset lockout duration to probably 2-5 **
which would give 2-5 minutes until the lockout ends. If -1 is set you may PERMANENTLY lock yourself out.
(YOUR EDITOR MAY LOOK SLIGHTLY DIFFERENT DESIGN WISE BUT FUNCTIONALITY WISE THEY ARE THE SAME)
The Secure Host Baseline (SHB) provides an automated and flexible approach for assisting the DoD in deploying the latest releases of Windows using a framework that can be consumed by organizations of all sizes.
- The ActivClient folder contains ActivClient Computer policy for those who use smart card logons with ActivClient software.
- The Adobe Reader folder contains Adobe Reader DC Computer and User policies for the latest version of Adobe Reader DC.
- The AppLocker folder contains AppLocker Computer policy for the latest version of Windows 10.
- The BitLocker folder contains BitLocker Computer policy for the latest version of Windows 10.
- The Certificates folder contains Computer policy for distributing the DoD Root and Intermediate Certificate Authorities.
- The Chrome folder contains Chrome browser Computer policy for the latest version of Chrome.
- The EMET folder contains EMET 5.5 Computer policy for any version of Windows.
- The Internet Explorer folder contains Internet Explorer 11 Computer and User policies for latest version of Windows 10.
- The Office folder contains Office 2013 and Office 2016 policy.
- The Windows folder contains Windows 10 User and Computer policies for the latest version of Windows 10.
- The Windows Firewall folder contains Windows Firewall Computer policy for the latest version of Windows 10.
Scripts and tools
Scripts for aiding users with the SHB are located in the Scripts sub folders of each component. Scripts available for use so far:
Compliance checks
Nessus (aka ACAS in the DoD) audit files are included in this repository. Compliance checks are available for:
Instructions for running the compliance checks in a domain or standalone environment can be found on the Compliance page.
Getting started
To get started using the tools:
- Download the repository as a zip file
- Configure PowerShell
- Load the code
- Apply the policies
- Check compliance
Downloading the repository
Download the current code to your Downloads folder. It will be saved as Secure-Host-Baseline-master.zip by default.
Configuring the PowerShell environment
The PowerShell commands are meant to run from a system with at least PowerShell 3.0 installed. PowerShell may need to be configured to run the commands.
Changing the PowerShell execution policy
Users may need to change the default PowerShell execution policy. This can be achieved in a number of different ways:
- Open a command prompt and run powershell.exe -ExecutionPolicy Unrestricted and run scripts from that PowerShell session.
- Open a PowerShell prompt and run Set-ExecutionPolicy Unrestricted -Scope Process and run scripts from the current PowerShell session.
- Open an administrative PowerShell prompt and run Set-ExecutionPolicy Unrestricted and run scripts from any PowerShell session.
Unblocking the PowerShell scripts
Users will need to unblock the downloaded zip file since it will be marked as having been downloaded from the Internet which PowerShell will block from executing by default. Open a PowerShell prompt and run the following commands to unblock the PowerShell code in the zip file:
cd $env:USERPROFILEcd DownloadsUnblock-File -Path '.\Secure-Host-Baseline-master.zip'
Running the PowerShell scripts inside the zip file without unblocking the file will result in the following warning:
Security warning Run only scripts that you trust. While scripts from the internet can be useful, this script can potentially harm your computer. If you trust this script, use the Unblock-File cmdlet to allow the script to run without this warning message. Do you want to run C:\users\user\Downloads\script.ps1? [D] Do not run [R] Run once [S] Suspend [?] Help (default is “D”):
If the downloaded zip file is not unblocked before extracting it, then all the individual PowerShell files that were in the zip file will have to be unblocked. You will need to run the following command after Step 5 in the Loading the code section:
Get-ChildItem -Path '.\Secure-Host-Baseline' -Recurse -Include '*.ps1','*.psm1' | Unblock-File -Verbose
See the Unblock-File command’s documentation for more information on how to use it.
Loading the code
Now extract the downloaded zip file and load the PowerShell code used for apply the policies.
- Right click on the zip file and select Extract All
- At the dialog remove Secure-Host-Baseline-master from the end of the path since it will extract the files to a Secure-Host-Baseline-master folder by default
- Click the Extract button
- Rename the Secure-Host-Baseline-master folder to Secure-Host-Baseline
- Open a PowerShell prompt as an administrator
- Import the Group Policy PowerShell module to load the code into the PowerShell session:
Import-Module -Name .\Secure-Host-Baseline\Scripts\GroupPolicy.psm1
Applying the policies
The Invoke-ApplySecureHostBaseline command found in the Group Policy PowerShell module is the main command for applying policies. By default this command will:
- Import both Computer and User policies. Use the -PolicyScopes option and specify only the ‘User’ or ‘Computer’ value to import only User or Computer policies.
- Import policies, that have an audit option (e.g. AppLocker), in audit mode. To import those policies in enforcement mode, use the -PolicyMode option and specify the ‘Enforced’ value.
- Make a backup copy of existing imported SHB Group Policy objects (and Group Policy templates if the -UpdateTemplates option is used) if they exist. The backups will be in a directory located at %UERPROFILE%\Desktop\Backup_yyyyMMddHHmmss corresponding to the time when the command was executed. To change this location use the -BackupPath option and specify a path to an existing folder where the Backup_yyyyMMddHHmmss will be created.
- not update the Group Policy template files that correspond to the applied Group Policy objects. Use the -UpdateTemplates option to update the Group Policy templates.
Options for the command are:
- -Path - Required. The path to the folder containing the downloaded and extracted GitHub SHB repository.
- -PolicyNames - Required. The names of the policies to apply. Can be 1 or more policy names. Available names: ‘ActivClient’, ‘Adobe Reader’, ‘AppLocker’, ‘BitLocker’, ‘Certificates’, ‘Chrome’, ‘EMET’, ‘Internet Explorer’, ‘Office 2013’, ‘Office 2016’, ‘Windows’, ‘Windows Firewall’.
- -PolicyScopes - Optional. The scope of the policies to apply. Available scopes: ‘Computer’, ‘User’. Defaults to ‘Computer’,‘User’.
- -PolicyType - Optional. The type of policies to apply. Available types: ‘Domain’, ‘Local’. Defaults to ‘Domain’ when joined to a domain. Defaults to ‘Local’ when not joined to a domain.
- -PolicyMode - Optional. The mode of policies to apply, if supported by the specific policy. For example, AppLocker supports audit and enforcement modes. Available modes: ‘Audit’, ‘Enforced’. Defaults to ‘Audit’.
- -BackupPath - Optional. The path to a folder to save backups of existing imported SHB Group Policy objects (and Group Policy templates if the -UpdateTemplates option is used) if they exist in case a rollback is needed. Defaults to $env:USERPROFILE\Desktop\Backup_yyyyMMddHHmmss corresponding to when the script was executed.
- -ToolPath - Optional. The path to the LGPO tool. Required when PolicyType is ‘Local’.
- -UpdateTemplates - Optional. Update Group Policy templates that correspond to the applied Group Policy objects.
Type man Invoke-ApplySecureHostBaseline at a PowerShell prompt for more help and examples or submit a question to the repository issue tracker.
Applying the SHB policies to a standalone system
If applying the SHB policies to a standalone system (e.g. not joined to a domain), then download the LGPO tool from this Microsoft blog post and extract the executable.
Invoke-ApplySecureHostBaseline -Path '.\Secure-Host-Baseline' -PolicyNames 'Adobe Reader','AppLocker','Certificates','Chrome','EMET','Internet Explorer','Office 2013','Office 2016','Windows','Windows Firewall' -ToolPath '.\LGPO\lgpo.exe'
I hope all goes well and your system works the way it should but with proper security policies set!
If you have questions about it before, during, or after installation let me know I will help to the best of my knowledge! 